Molds
Design->Master->Mold->Toy
A mold is what silicone is poured into to produce the toy.
Molds generally fall into four categories with seven subcategories:
- Glove
- Supported
- Unsupported
- Block
- Solid
- Cut
- 2 Part
- Cavity
- Matrix
- Hybrid
- Direct 3D Printed
What type of mold you start with will depend on your design background, workspace size and needs, and the types of shapes you will be producing. Something many makers run into is that the mold technology used for prop making and art can be applicable for making silicone sex toys; but is not specific enough for what we're using it for, and is what most mold tutorials cover. These tutorials generally include supported glove molds and all types of block molds.
- Supported glove molds are time consuming and are prone to death by mold swell when casting super soft silicones into them.
- Solid block molds are hard to apply mold release to and can be very hard to pull finished toys from.
- Cut and layered molds have seams which must be trimmed, and are sometimes shunned by customers who view seams as difficult to clean / sanitize, or not aesthetically pleasing.
- For all mold types you will want to assume that mold material is transferring to the finished products, so use materials that are as close to Skin Safe as possible, and shy away from anything with alarming warnings in the SDS.
Mold Shells💚
Several mold types use a mold shell. This is a rigid shell that goes outside the soft mold and helps support it. Molds that require shells need to be aligned somehow and held together into shape. Many makers use hot glue for this, but be aware that once silicone gets on the shells, you may find that the hot glue stops adhering well. Binder clips, rubber bands, and thumb screws are other options, but these do not create a leak-proof barrier. One option is to first fill the mold shell with just a small amount of silicone and roll it around to coat the insides of the mold shell for adhesion, or even just brush a little silicone onto the mating surfaces before the shells are clamped together. Wait for this silicone to jell/tack up a bit, and then fill the mold shells with your molding silicone. While designing your masters and molds, keep in mind that you will need a way to connect everything together during mold build. You can simply glue the master to a table; but a little up-front work to include a standard bolt hole pattern in the bottoms of the masters, or adding a flange you can clamp down, will save you a lot of time and wasted silicone in the long run.
Mold Types and Pros / Cons
Glove Molds - Supported

Image from Smooth-On tutorials for brush on molds HERE and support shell HERE
A supported glove mold is made by building up a soft "glove" of silicone onto the master followed by a rigid support shell. These are great because they do not have seams, are easy to pull toys from, and can be flipped inside out to perform maintenance on the mold, or ensure even coats of release agent. The downside is they take a long time to make, and swell from silicone oils leaching out of super soft silicones like Eco Flex, which can cause them to no longer properly fit into their shells.
Overall: ★★★✬☆
Build Speed: ★★☆☆☆ 3-5 hours per mold, because you can generally only make one at a time. You also need to make the shell by hand.
Ease of Design: ★★★☆☆ Relatively easy, but some thought must be put into how to design a shell that can be removed and replaced.
Ease of Use: ★★★★☆ As long as you build the shell correctly this mold will stand up on its own.
Durability: ★★★★☆ Fairly durable, but as the glove portion swells, it will eventually stop fitting in the shell.
Cost: ★★★★☆ Very low silicone usage, but you will also need brushable resin for the shells. Plaster-impregnated cloth can be used, but may not be durable enough for the hundreds of casts the mold will be used for.
Toy Quality: ★★★★★ Full details and no seams. Shell keeps the proportions the same as the master.
Glove Molds - Unsupported

Image from ShopDad's vault.
An unsupported glove mold is a mold made a little bit thicker than a supported glove mold and without the mold shell. To use this type of mold, it is hung through a hole in a stand. The stand can be 3D printed, or it can simply be a hole in a big cardboard box or table. All silicone molds will absorb silicone oils from super soft silicones like EcoFlex, causing them to swell over time. This is worse in thinner molds like gloves. Because there is no mold shell for the glove mold to go inside of, the swelling will not cause mating issues--you will just get slightly larger toys over time. Glove molds can be made by brushing silicone on or by pouring layers of silicone.
Overall: ★★★★☆
Build Speed: ★★★★☆ Once you get the hang of building multiples at the same time, the active time to create per mold is about 1 hour.
Ease of Design: ★★★★★ Very Easy. Additional design work not likely required.
Ease of Use: ★★★☆☆ Easy to use one or two at a time (cut a hole in a cardboard box). Special set up needed to use many at one time.
Durability: ★★★★☆ With a thick enough build and regular maintenance (flip the mold inside out to recoat with release agent every dozen casts) they can last for a while.
Cost: ★★★★★ Cheapest mold to make because of its low material use, but may need to be replaced sooner depending on your tolerance for toy-to-toy variances.
Toy Quality: ★★★★☆ Full details and no seams, but because this is an *unsupported* glove it will not have the exact same dimensions as the master.
Block Molds - Solid

Image from Smooth-On block mold tutorial HERE
You haven't lived until you've given yourself a black eye trying to pull a toy out of a block mold. There are a lot of great things about these molds, other than trying to pull casts out of them. You can use a soft silicone below a 10A shore hardness, but then durability of these molds drops off. Durability is also impacted by the challenge of evenly coating the insides with release agent.
Overall: ★★★✬☆
Build Speed: ★★★★★ Strap down the master, plop a container around it, fill with silicone.
Ease of Design: ★★★★★ See above.
Ease of Use: ★☆☆☆☆ Just about the hardest mold to pull anything out of. You will destroy a master or two trying to get them out.
Durability: ★★★☆☆ You would think a solid block would be durable, but there's no good way to apply mold release to the inside other than sloshing around a liquid release agent. Because of this, block molds take a beating.
Cost: ★★☆☆☆ Huge block of silicone costs huge block of money, especially if the first mold is a flop.
Toy Quality: ★★★★★ No seams and very accurate size because the mold does not flex much.
Block Molds - Cut
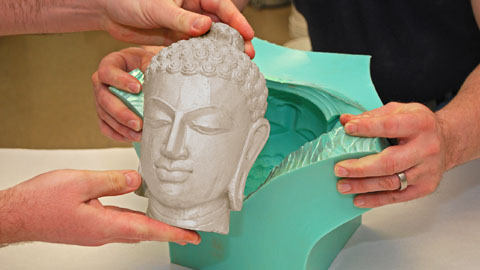
Image from Smooth-On cut mold walkthrough HERE
A cut mold is a block mold where a sharp blade has been used to cut the mold open, so toys can be easily removed and the insides adequately coated with release agent. The cut is usually done in a zig-zag pattern, as this helps the mold mate when it is closed again. You must be very careful not to cut into the master while making a cut mold. Over time, silicone can leak into the cut and adhere, causing the mating features to not work as well and the seam line to worsen. Makers with high dex scores can place the cut line so that it is hidden within the features of the toy, but this skill can take years to master.
Overall: ★★★★☆
Build Speed: ★★★★☆ Nearly as fast as a solid block mold, but you will need to take the time to carefully cut the master out of the mold.
Ease of Design: ★★★★☆ Nearly as easy as a solid block mold, but you will have to do some planning as to how best to cut the mold to hide the seam lines.
Ease of Use: ★★★☆☆ Cut molds are a little tricky to keep clean, and can be hard to pull open to apply more release agent without a cut line tearing. Additionally, toys will have seams that add to post-processing time.
Durability: ★★★★☆ Pretty durable. Because they are a big chunk of silicone, they normally take a very long time to absorb enough silicone oil for any meaningful changes to happen to the mold. The cut line can propagate, but this can often be ignored as long as the line starts and ends in an easy to trim / clean place on the toy.
Cost: ★★☆☆☆ Huge block of silicone costs huge block of money, especially if the first mold is a flop.
Toy Quality: ★★☆☆☆ This rating can be increased over time as a maker becomes more skilled with the blade; but for the novice, there will be a pretty visible zig-zagging seam on the toy.
Block Molds - 2 (or more) Part

Image from Smooth-On 2 piece mold walkthrough HERE
Similar in many ways to the cut mold above. If you are a master of the blade, use a cut mold. If you are better at pre-planning and visualizing how things fit together, use a 2 part mold.
Overall: ★★★☆☆
Build Speed: ★★★☆☆ You must wait for each individual part of the 2 part mold to cure before using, or you risk the whole thing adhering.
Ease of Design: ★★★★☆ Adding keys / locating features to the mold is easy in theory, but doing it such that you get a barely noticeable seam line takes a lot of practice. More so if the seam line looks best following a curve where a flat plane layer doesn't work.
Ease of Use: ★★★☆☆ Mating two sides of a 2 part mold, and keeping the mating features free of extraneous silicone plus the need to trim seams knocks the star rating down two notches.
Durability: ★★★★☆ Pretty durable as long as you keep them clean and well maintained.
Cost: ★★☆☆☆ Huge block of silicone costs huge block of money, especially if the first mold is a flop.
Toy Quality: ★★★☆☆ There will be a full length seam all the way around the toy. Experienced makers learn to hide this seam, usually in features on the toy during the design process. You can not improve it without rebuilding your first masters, but in your later masters, you will.
Cavity - Matrix

Photo used with permission from Wandering Bard Toys
A matrix mold is made by 3D printing a shell that goes around the master,and leaves room for the silicone to be poured in. It is something like a more controlled version of a supported glove mold; but the shell is made first, and then the glove is cast into the mold shell. Design is generally only challenging the first few times, but figuring out how to clamp everything together takes some thought. The biggest limitation to this type of mold is the need to print a new mold shell for every mold you want to add. So if you want 3 medium dragon molds ready to pour into, you need to print 3 sets of medium dragon mold shells.
Overall: ★★★★☆
Build Speed: ★★★★☆ Pretty fast, assemble the shells and fill with silicone. Depending on your design skills, assembling the parts may be super easy, but more likely to be something of a challenge.
Ease of Design: ★★★☆☆ It gets easier as you learn the process steps and get a feel for what kind of tolerances to use on the mating features. DarquePath and GrumpyAlison have videos you can follow for help HERE
Ease of Use: ★★★★☆ Easier to pull like a glove mold, but you will need to take apart the shells and put them back together each time you use them.
Durability: ★★★★★ Nice thick silicone walls take a long time to swell, and if designed correctly, they can still be flipped inside out or at least partially inverted to allow proper mold maintenance and release agent use.
Cost: ★★★★☆ You need a little more silicone for these than for a glove mold, and will need to print a new shell for each mold you want to have in service.
Toy Quality: ★★★★★ Full details and no seams. Shell keeps the proportions the same as the master.
Cavity - Hybrid

Image from ShopDad's vault.
Hybrid molds are a mold type for mass producing molds. You just clamp shells around the master, fill with silicone, and wait for cure. Once cured, the shells are removed, and the mold stands on its own. Because these take a lot of upfront design knowledge, it is better to creates masters with locating features for use in a matrix mold or block mold, and then use those features to mate them into a hybrid mold design when you reach the point where you need more than a dozen of each mold.
Overall: ★★★★✬
Build Speed: ★★★★★ Every time you want a new mold you simply clamp the pieces together, fill with silicone, and wait for cure.
Ease of Design: ★★☆☆☆ Probably the most challenging to design well. Parts need to align correctly and produce a mold that minimizes silicone use, while being self standing, stable, and level.
Ease of Use: ★★★★★ They are easy to set up like a solid block mold, and are easy to pull without having to remove shells like an unsupported glove mold.
Durability: ★★★★★ Nice thick silicone walls take a long time to swell, and if designed correctly they can still be flipped inside out or at least partially inverted to allow proper mold maintenance and release agent use.
Cost: ★★★★☆ You need a little more silicone than a matrix mold or glove because of the support fins, but you only need to print the shells one time.
Toy Quality: ★★★★★ Full details and no seams. Reinforcing fins hold the dimensions much better than an unsupported glove mold when designed correctly.
Direct 3D Printed
(Example Photos Needed)
The wild west of molds. These can be solid single piece molds, or layered molds with complex mating features. With a good enough printer, this is a viable option; but is currently only used by very few shops because of challenges with eliminating printer textures on the finished toy.
Overall: ★★★✬☆
Build Speed: ★★★★☆ Yes, the printer may take hours or even days to make the mold, but it does that while you are sleeping and watching your stories.
Ease of Design: ★★★☆☆ 3D printed molds are rigid, so final toy design considerations must account for this. Also, the presentation of parts to eliminate the need for supports can pose a challenge.
Ease of Use: ★★★☆☆ You're either pulling toys from a rigid mold or trimming out full wraparound seam lines from a 2 part mold. Either way, this is extra work to use.
Durability: ★★★★★ These molds can be effectively permanent, unless you use acetone smoothing on them, which is a whole other topic.
Cost: ★★★★☆ Most printer materials are relatively cheap.
Toy Quality: ★★☆☆☆ Printer texture for days. Even the best shops currently using direct printed molds have not entirely eliminated it.
Care and Feeding of New Molds 💚
The point of these molds isn't to make one or two props that look good from a distance. It's to make hundreds of safe, high quality toys with consistent surface texture, free of pitting and tears. This means treating them like the special friends they are:
- Allow 48 Hours Before First Use:
Yes, you want to use that mold RIGHT NOW. Don't! After pulling the master from the mold, give it 48 hours exposed to air to minimize potential chemical bonding to the surface on the first pour.
- Low Temp Oven Cure:
Bake at 200℉ for 2hrs, or follow the silicone manufacturer's recommendations for the first use of the mold after pulling the master. This pushes the reactions in the silicone further toward completion and also reduces potential chemical adhesion IE, lowering the possibility of your first cast totally destroying your pretty new mold by getting stuck inside.
- Mold Release EVERYTHING:
The inside, the outside, the bottom, the top. The last thing you want is silicone dripping down the sides and adhering in a big blob so the mold shell stops fitting correctly. However, too much mold release can cause surface defects on a toy, and cure inhibition has been reported as well. It is better to use too much and then skin the mold to remove excess, than to use too little and ruin the mold and the first toy.
- Record Mold Data:
Get a little notebook or start a spreadsheet on your computer. When did you make it? How much did the mold weigh before you started using it (to track mold swell)? How did you prep it? What type of material is the mold shell? Is there anything noteworthy about it? This takes a few minutes to do, but being able to look back a year from now, and see that "all the molds that were seasoned with the alcohol and soap method lasted a lot longer than other molds" is a huge help to you and every shop you share your findings with.
- Keep it Clean!:
Shops can be messy, goo filled explosions. Molds get coated in drippy and sticky silicone runoff. They then get moved, knocked over, stored, buried, lost, found, and stored again. If you do not regularly clean your molds, the build up on the outside from yesterday can become today's flop and cause inclusions. Or worse, cure inhibited material from the outside of a mold can transfer to the inside of a mold and ruin it.
- Store Molds Covered:
Tape an index card over the opening. Pull a plastic bag over and rubber band it. If the mold is not in active use in the next few days, do something to protect the mold. The 15 seconds to protect a mold will save you $30 of flopped silicone when debris or dust ruins the next pour. This is especially important when putting multiple dirty molds away together for storage. Do not fill a big tote bin with uncovered molds and expect to pull them back out ready to use.
Future topics:
Materials
Walkthroughs for preferred mold types
Other tips and tricks - marking molds
More community resources needed
Example Files for Follow Along and Learn Project
Blender "Donging in 10 minutes" Videos for Mold Shells